Showing posts with label design. Show all posts

Thursday, October 17, 2013

No Sew Curtains

Curtains are one of the easiest projects to tackle yourself - no sewing required! You'll need fabric, an iron, and hem tape.

First, decide the length of your curtains. You can measure the window, or use an existing curtain/liner as a guide. Since I didn't want the liner peaking out from behind the curtains, I made them 4 inches longer (also, so they would graze the floor).


The fabric had a white edge I could use as a guide to iron an even edge on the sides.

Enter magical hem tape! Even if you're sewing-inclined, sometimes you don't want a line of thread down the side of a project. You slide the tape between two pieces of fabric and iron... they stick together and you're ready to go!

Once the sides were done, I made an inch hem at the top. I angled the corners in, so there would be a clean edge at the top of my curtains. 

I then folded the top over 4 inches to make my rod pocket. I carefully laid hem tape down to stick my first hem to the back of the curtain.

Because the fabric was thick, I turned to iron the back to be sure the hem tape fully melted and stuck the pieces together.

Taadaa! Rod pocket complete. Notice the folded in corner? That way you don't see the fabric peeking out from the front of the curtain if it hadn't lined up perfectly.

Instead of creating matching hems at the bottom, I lined up the tops to make sure both panels were the same length. No surprise, they weren't. 

So, with the tops (already with rod pockets) lined up, I laid out the curtains straight to see how off my cutting was at the bottom.

I folded the ends and did a quick iron to make a crease to use as a guide when making the bottom hem.

Not precise, but closer than if I had just put a 2 inch hem on the bottom of each.

I ironed and hem-taped the bottom of each panel using my crease as a guide. Notice how the hem size changes? I'm not very straight with the scissors... 

I flipped the corners in, so the front has a clean look. If you're curious, you can see the fabric name below. IKEA baby - cut your own fabric! 

Curtains hung! Forgive the bad iPhone picture (nursery #2 post coming soon)!

I got enough fabric to do two panels and extra to do bolster pillows and whatever my brain thinks up.

Saturday, September 14, 2013

Nursery #2

It was fun to design a nursery for baby girl. With babe #1 we didn't know we were having a little boy. We decided to make the nursery feminine, but not too girly; here is the result:


As soon as I knew we were having a girl, I wanted to base the nursery on a poster I purchased while living in Spain. The stars hanging above the crib are also goodies I brought home from Spain.


The bright yellow was a starting off point, and I came across the fabric for the curtains at Ikea. It was perfect with pops of soft and bright pink with the bold yellow and blue. Look for an upcoming no-sew curtain tutorial. I also used the same wall color as we did in the first nursery (Dorian Grey).

We never purchased a changing table for babe #1, so his dresser is still being used in his room. We purchased another dresser from Ikea, but this one is a bit higher. It's the perfect height to change baby on. We are using the same cloth diaper system (see this post and this post) as we did with #1.


As with all things Ikea, you need a patient and skilled helper (dad did most of the build):


It is nice that we are able to reuse the rocker, crib, rug, and changing pad from the first room... one of the perks of staying gender-neutral with a first baby! We are also using the same Angel Care monitor that is on my must have list.


I didn't hang as many pictures/shelves as I did in our first nursery. I got tired of dusting all of the time, so we are staying minimal. There are a few family pictures in the room, so baby girl has loving faces watching over her.

I'm sure I won't spend as much time in this nursery as I did in the last. The days of sitting quietly for hours on end are a thing of the past - now I will be running around keeping up with a spunky toddler!

Thursday, January 10, 2013

Custom City Canvas

I've always liked the art that has city names on it.  It's very modern and graphic - just our style.  I didn't want to pay $300 and up for things like this or this - plus, every one I found would have a random I hadn't been to (or didn't care for).

So, I did what any 8-months-pregnant lady does - I made one!

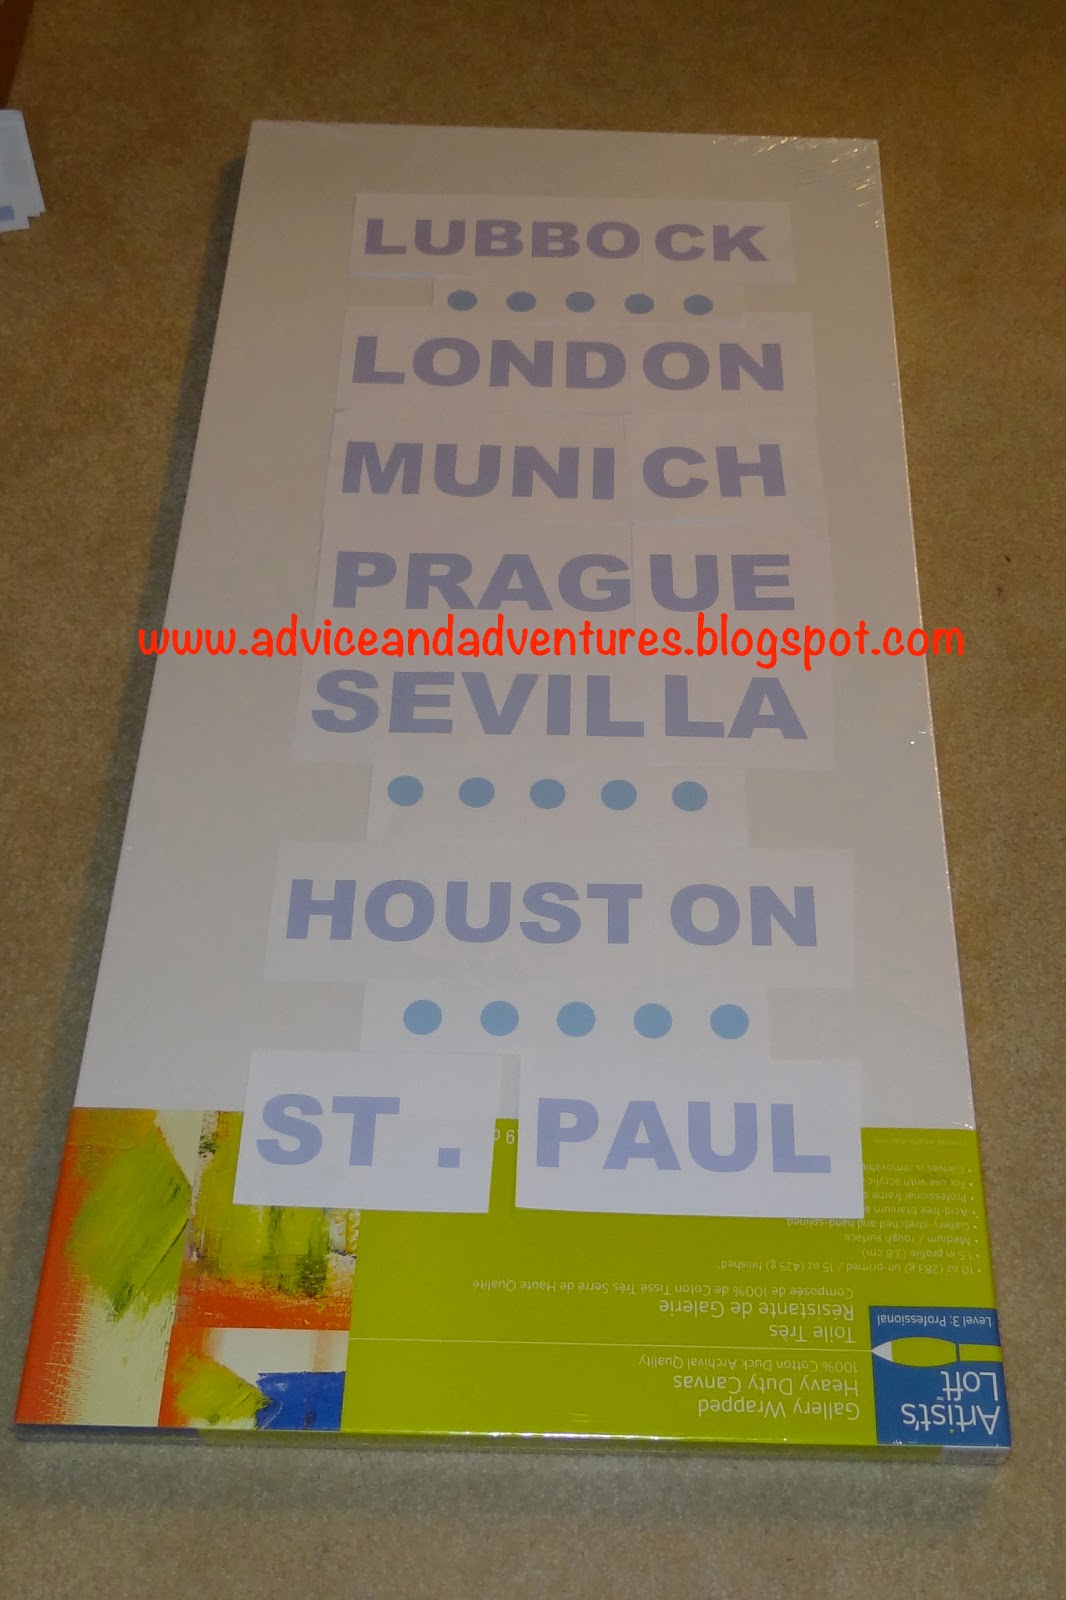
I got a large canvas at Michaels with a 40% off coupon (their canvas always seems to be on sale) and a large tube of quality acrylic paint.  I also used freezer paper I keep on hand (for other craft projects).  I decided what cities I wanted on the canvas.  It ended up being a list of cities the hubs and I visited or lived together.  

I printed out the letters on paper in a bold font I liked and laid them out for spacing purposes:


I held freezer paper behind the letters (waxy side facing down/away) and cut out each letter.  I laid them back out on the canvas.  I added some painter's tape guides so I would stay straight:


Removing the top layer of copy paper (the blue letters), I was left with freezer paper letters only.  I removed the tape guides, and with an iron on low settings, I ran the iron over the paper slowly so the waxy side stuck to the canvas.  Be sure the iron is clean!


I first tried using a roller to paint over the letters, but the texture made the coverage uneven.  I switched to a 2" brush to finish the canvas.  Once I painted two coats I peeled off the letters (I got excited with the U and the L below):


Taa daa!!! The letters didn't turn out perfect - some letters didn't stick all the way down, but I like the imperfection.  Most of the expensive store options are a bit imperfect too. I decided not to continue the black paint around to the canvas edge - it felt like a frame by leaving it white.

The canvas found a home in our grey/black/white nursery, but it certainly can move to other rooms of our house in the future.  It's nice to have a personal touch to remind us of our travels!

Budget Breakdown:
Canvas - $28
Acrylic Paint - $7
Brush - already owned
Freezer paper - already owned

Can't beat a $35 art project that can be enjoyed for years to come!  
What personalized art have you created? 

Thursday, January 3, 2013

The Nursery

The fun thing about setting up the nursery is that the pregnancy becomes more of a reality.  It's finally a physical acknowledgement that this baby is coming (other than the big 'ol belly)! Plus it's heartwarming to watch the hubs put together furniture :)

We wanted to go neutral with our nursery, and we also wanted it to stay in the theme of the rest of our house.  Some nursery designs scream 'BABY!!!!!' and that just wasn't our style (although I've seen some SUPER CUTE ones).  We kept it neutral for two reasons: 1) we didn't know the babe's gender, and 2) we wanted to be able to use it for a future baby OR to grow with the babe as they got older.

The hardest part was picking out the wall color.  You can't imagine how many grey options there are!! We narrowed it to 4 and purchased $2 test tubs from Lowes.  I painted test patches around the room to see how they looked in different lights.  Some grey is blue, some looks more green, some end up looking beige, and some turn a room into a cave...  


We settled on Dorian Gray - the 3rd one down.  The irony of using Dorian Gray in a baby's room was not lost on us. It wasn't too dark, and didn't seem blue or green to us.  We used a no-VOC paint so there wouldn't be fumes. We also ran two HEPA filter fans for 48 hours to get rid of any non-baby friendly air. It never smelled like a freshly painted room - that was good peace of mind.


Our nursery is technically an office, so it has french doors that we leave wide open (except for naps and bedtime).  Here's the right side of the room (there's a closet behind that door):

...and here's the left!


Here's a full view of the nursery (with notes below)


1) There is a beautiful ink drawing by my sister, and lots of pictures to help learn family members
2) Custom artwork I made that chronicles all of the special places to me and the hubs
3) A clock that can be seen from the chair - to time feedings
4) A stylebabyLOG book to track feedings/diapers
5) A custom Bumbo cover to match the room (also a HEPA filter fan stayed in the room)
6) A lamp who's base lights up as a nightlight (don't want to turn on the overhead light for night feeds)
7) 2 hampers and a trash can hidden in a corner
8) mom & dad looking over a sleeping baby :)
9) a mini-crib to take up less space - converts into a toddler bed and a headboard (hooray for multipurpose!)
10) hidden burp cloth stash and bottles of water
11) amazing chair referenced in this post
12) Boppy with homemade cover to match
13) rug that will be comfortable when the babe starts crawling around (also hides stains)

And yes, we have a TV in the nursery.  It was helpful for those hours-on-end sessions when the babe just didn't want to be alone.  It's also nice to have something on in the background when we're playing on the floor.

We figure the dresser, the TV/book stand, the rug, curtains, and the shelves can be used well into teenage years (or sent to other rooms in the house).

DIY tutorials coming soon on the custom pieces!!

What is your favorite part of your nursery? Do you have any super-personal touches?